
Have a user make a choice by using the “Make a choice” block within the “Ask a question” category. This will have your bot ask the user a question in a way that requires them to make a choice from a list of available options.
TYPICAL USES FOR THIS:
- Asking a user to make a selection either as a direct variable input (to answer with specific information).
- Asking a user for an opinion or rating.
- Trying to direct the user engagement along a specific flow/path within your bot by requiring them to make a choice.
Lets unpack the available features within this block and what you can do with it.
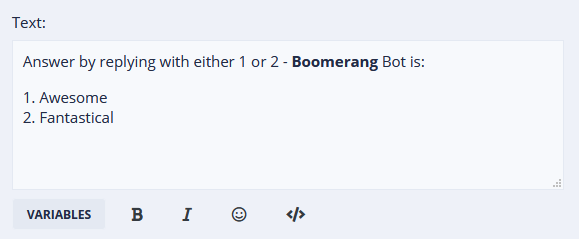
Text – Here is where you will phrase your call to action to the user by having them make a choice. Be sure to think through how you want to phrase this interaction and cue your user to the kind of expected input you require for them to successfully make a choice. You can enrich the question using variables and styling to include bold, italics or emoticons.
Use a variable such as @@Name for example if you’d like to address them by name, or any of the other variables you may have used from earlier interaction streams.
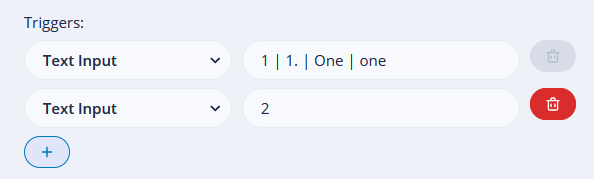
Triggers – Here you will determine the triggers depending on the user input you’ve requested. In the case of the example here, there are 2 possible text inputs you are requesting from the user.
- Awesome
- Fantastical
Therefore, you need 2 triggers, both of which will create a fork in your flow/stream which can produce 2 different outcomes.
Because you have specified the user (in the “Text”) to answer with either a 1 or a 2, Buildabot will route the user to the appropriate fork in the flow/stream from where you can produce a different result.
- 1
- 1.
- One
- one
As a result, you can cater for accepting multiple reply variants by simply "piping" like this:
1 | 1. | One | one
Any of the above 4 will now be considered by your bot as an acceptable "User Input" which will direct them to the appropriate flow/stream.
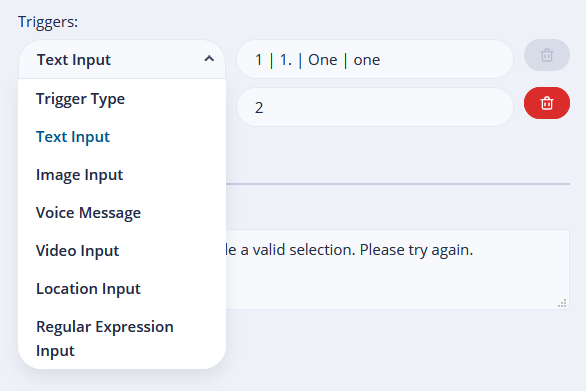
Types of Triggers – There are a few different types of triggers that can be used. They are:
- Text Input – Will accept plain text inputs from a user. Both text and numeric values will work, and you can cater for variations of an input by using the pipe | symbol to separate variations. Eg: If you want the user to enter the number 1, however consider they may type the word "one" also, you can handle this by entering "1 | one".
- Image Input – Will accept any image sent by a user.
- Voice Message – Will accept any voice message sent by a user.
- Video Input – Will accept any video message sent by a user.
- Location Input – Will accept any location input sent by a user.
- Regular Expression Input - Will accept a regular expression type input by the user.
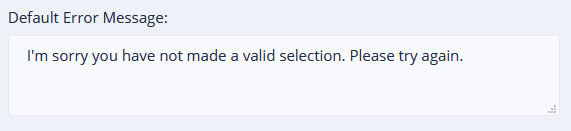
Default Error Message – As the name implies, you can provide an error message of your choice to cue your user with more information on what you expect the format of their answer should be. Useful if you are expecting a specific type of input, which in this example we are, either a user input of “1” or “2”
Once created, your question will appear as follows in the bot builder flow:
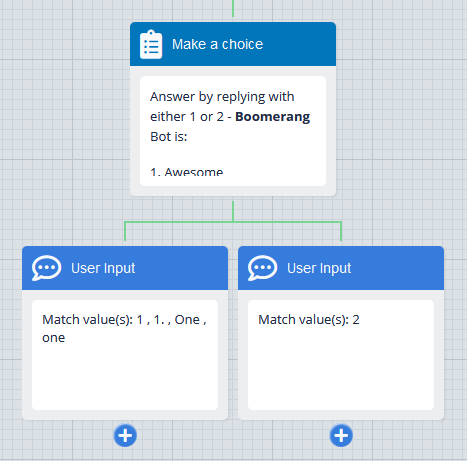
As you can see from above, there are 2 new “User Input” blocks which have appeared where the condition is:
- User Input (Block 1 on the left): “Match value(s): 1”
- User Input (Block 2 on the right): “Match value(s) 2”
You now have a fork in your flow/stream from which you can choose 2 separate further interactions your bot can make with your user going forward.
Let’s take a look at this entire flow below:
Do this by:
- Adding a new block.
- Selecting “Ask a question” as the category.
- Select the “Make a choice” block.
- Enter your text in the “Text” field.
- Complete triggers depending on how you’ve phrased your call to action in the “Text” field from the previous step.
- Customize your “Default Error Message” if you’d like.
- Click on save to add the block to your bot flow.